I started a family recipe journal. Here's what happened
If you’ve seen any of my other blog posts or social media posts, you’ll know that I love to journal. My shelf and desk are full of journals. I love plain journals mostly, but I also have self-care journals, a business journal, travel journals, and now, I have a recipe journal. I bought some recipe journals for Write and Craft because they were so beautiful, and because I knew they would be popular among customers. I decided to open one up and try it out for myself. Even though I’m not someone who cooks a lot, I am definitely someone who loves to eat, and I love all the family recipes I grew up with. Here in this blog post, I want to tell the story of some of the beautiful food that my family cooks and some recipes that are special to us.
Firstly, when I opened the recipe journal, I wanted to get a special family recipe from my Nana. We spent a lot of time with my Nana when we were children, and my Nana is known for her adventurous cooking. She created recipes herself from scratch all the time, and you never knew what you were going to get from her. There was always something different. A few of the favourites from my Nana included donuts and sponge cake. Her sponge cakes are famous, she makes them for every family gathering and event. I asked her to share the recipe for the family recipe journal, and I am so excited to try it out. Nana tells me that this is a no-fail recipe. I have decided to share the recipe here, exactly as I have written it in the journal to share this special recipe with all the readers.

Nana’s recipe is a little different to other sponge recipes. She doesn’t separate the eggs, and she swears that this recipe is easier than other recipes. She also has always said that Duck eggs make the best sponges. If you can get your hands on duck eggs, definitely try a sponge with them!
Nana’s sponge recipe:
Ingredients:
- 4 eggs
- ¾ cup caster sugar
- 1 cup of cornflour
- ½ teaspoon of bicarb soda
- ½ teaspoon of cream of tartar
- A little icing sugar
- 300ml whipped cream
Method:
- Preheat oven to 170 degrees Celsius
- Beat the whole eggs (including yolks) for three minutes
- Add caster sugar and beat until dissolved, or about 1 minute
- In a separate bowl, sift the cornflour, bi carb soda and cream of tartar twice
- Add the cornflour mix to the egg mix and gently use a whisk to fold it in, don’t overmix
- Pour the mixture into two cake tins
- Bake in the oven for 15 – 20 minutes. Do NOT open the oven before 15 minutes, as this will cause the sponge to sink
- When the sponge is cool, whip cream and add a little icing sugar. This helps the cream stabilise and adds sweetness
- Add the cream to the top of one cake and gently add the other cake to the top
- Sift a little icing sugar on the top, or make icing
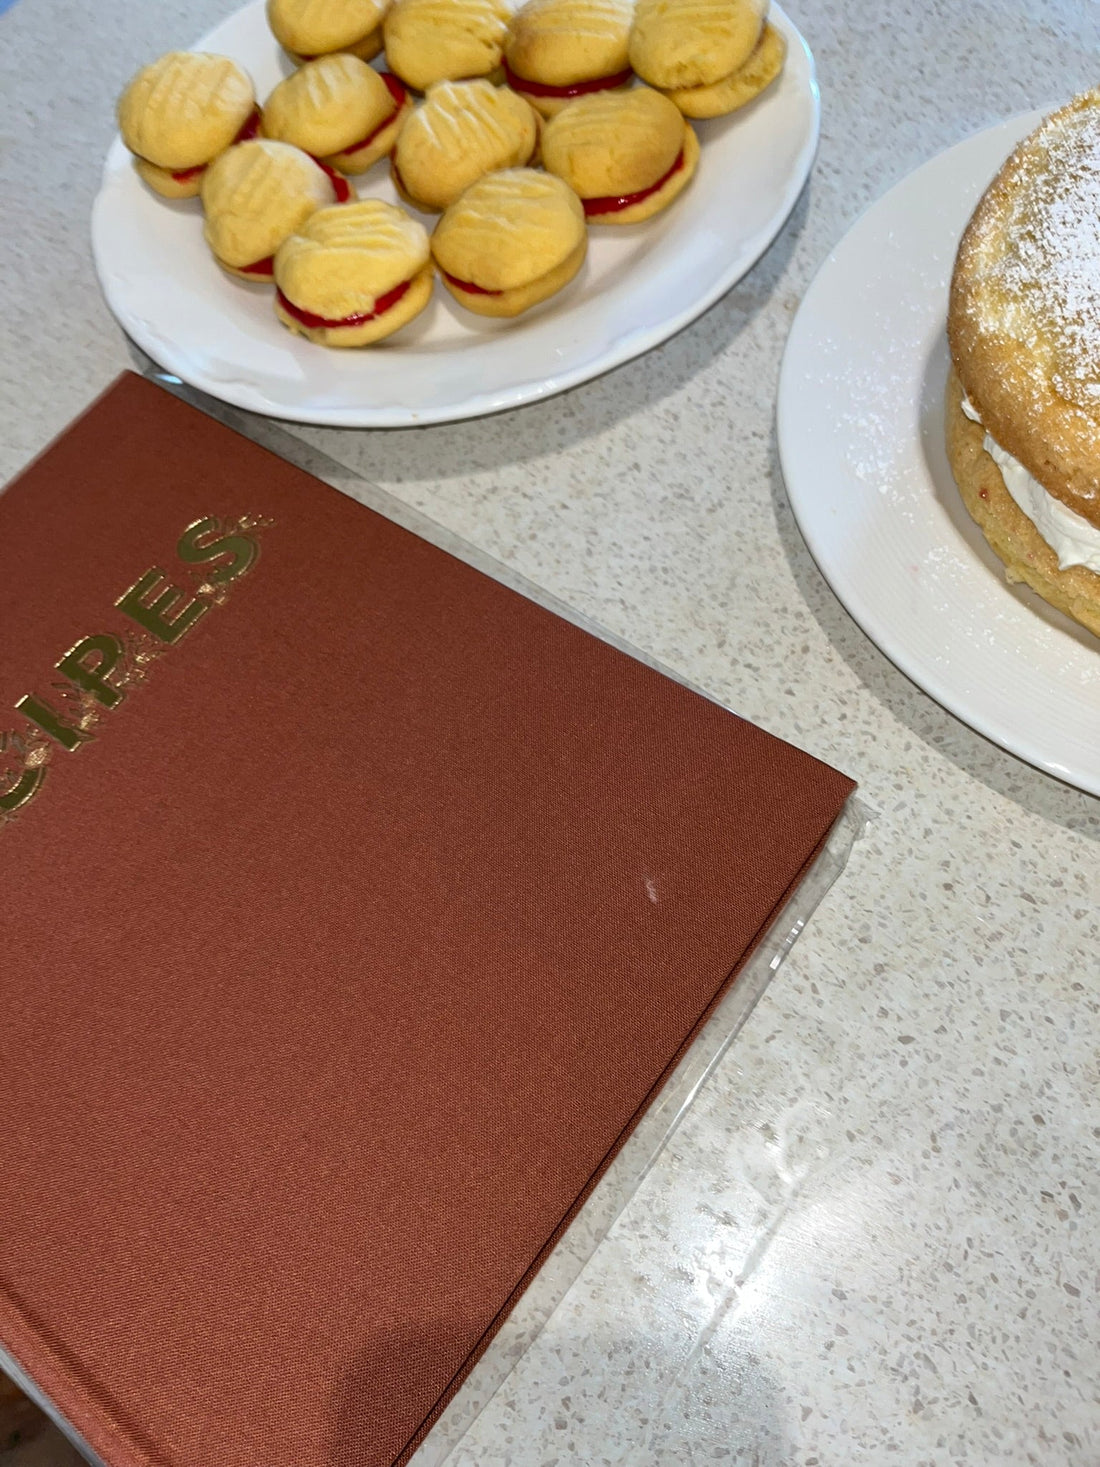
I had a go at making this sponge after getting the recipe from Nana. Although it wasn’t as perfect as Nana’s, it was pretty decent! I enjoyed baking it, and I enjoyed decorating. Here is my attempt! I think it’s pretty good for a first attempt at a sponge cake. I will keep trying, and I will be sure to use this family-favourite recipe in my recipe journal.

Next, I have decided to ask the rest of my family for their recipes to add to my recipe journal.
My mother has always loved to bake. She loves making desserts, and loves making biscuits, cakes, and desserts for everyone. She always has something nice to share at family dinners and on special holidays. Some of my favourite foods today that I love to eat are things that my mother made when I was a child. An all time favourite that I asked her to share for the recipe journal is lemon meringue pie. I have made this recipe myself for family gatherings. I love the tanginess of the lemons and the sweetness of the meringue. When time permits, mum always makes her own pastry, but if in a hurry, a frozen pastry pie base also works. Mum often made lemon meringue pie using the lemons from her mother in law’s lemon tree, and the eggs from the backyard chooks. We always said this made them taste even better.
Here is our family lemon meringue pie recipe from the family recipe journal. Mum thinks it comes from the Women’s Weekly originally, so we can’t claim it as our own recipe, but we certainly can claim it as a favourite!

Mum’s Lemon Meringue Pie recipe:
Ingredients:
Pastry:
- 1 ½ cups of plain flour
- 1 tablespoon icing sugar
- 140 grams butter
- 1 egg yolk
- 2 tablespoons cold water
Filling:
- ½ cup of cornflour
- 1 cup caster sugar
- ½ cup lemon juice (better if it’s from the lemon tree in the yard!)
- 1 ¼ cup water
- 2 teaspoons finely grated lemon rind
- 80 grams of butter
Meringue:
- 3 eggs separated
- ½ cup caster sugar
Method:
Pastry:
Alternatively, use a purchased sweet pie case
- In the food process, process the flour, icing sugar and butter. Add the egg yolk and the cold water to the food processor and keep processing until the ingredients all come together
- Knead the dough until its smooth
- Wrap pastry in cling wrap and cool in the fridge for half an hour
- Grease a round loose-based pie dish
- Roll the pastry between two sheets of baking paper until it will fit in the pan.
- Put pastry into the pan, press into the sides and trim the edge. Cover and cool for 30 minutes
- While pastry is cooling, preheat oven to 200 degrees Celsius
- Line the pastry case with baking paper and fill with dried beans or rice.
- Bake for 15 minutes with the rice or beans on top, then remove them carefully, and bake for another 10 minutes
Filling:
- Combine cornflour and 1 cup of caster sugar in a saucepan. Gradually stir in juice and water until smooth
- Cook with the saucepan on high heat, stirring continuously until the mixture boils and thickens, then reduce heat to low and stir for 1 minute
- Remove from the heat and stir in rind, butter and egg yolks. Cool for 10 minutes
- Spoon the lemon filling into the cooked, cooled pastry case and spread the filling out evenly. Use a fork to roughen the surface of the filling.
- Cover and refrigerate for two hours
Meringue:
- Preheat oven to 200 degrees Celsius
- Beat the egg whites with an electric mixer until soft peaks form
- Gradually add ½ cup of caster sugar and beat until the sugar dissolves
- Spread the meringue mixture on top of the prepared pie with filling
- Bake for about two minutes or until the meringue is lightly browned
This is a pie that I always remember having for special occasions as a child, so its something I still love to make today. To me it tastes like birthdays, special afternoon teas, and Christmas parties. Although it takes a while to prepare, it’s well worth it when you bite into the tangy lemon filling, accompanied by the sweetness of the meringue. It’s an all time favourite in our family that has rightfully earnt its place in the recipe journal.
After the lemon meringue pie from my mother, I asked my sister for a special recipe to add to this family recipe journal. This is an extra special one, as my sister has cooked it for years after she received the recipe from our late grandmother (our dad’s mum). Our grandmother only had a small number of different dishes she cooked, but each one she had perfected with old recipes she’d used since her childhood. My sister kept this recipe and still uses it. The recipe is for yo-yos, which are also known as melting moments in some places.

I have many memories of eating and baking yo-yos as a child with my grandmother, and my mother, sister and I kept making this same recipe for many years. As children, we used to separate the two sides of the yo-yos and lick the icing from the inside. Now I just love eating them whole.
Here is our grandmother’s yo-yos recipe
Yo-yo recipe:
Ingredients:
180 grams of self-raising Flour
180 grams of butter
60 grams of icing sugar
60 grams of custard powder
Icing:
2 tablespoons of icing sugar
1 tablespoon butter
Vanilla essence
Method:
1) Cream together butter and sugar
2) Sift flour and custard powder three times and mix with creamed butter and sugar mix
3) Roll mixture into small balls and place onto lined baking tray
4) Flatted tops with a fork
5) Bake in moderate oven until page gold in colour
6) When biscuits cool, join with icing
Icing:
1) Mix together icing sugar, butter and vanilla. Add food colouring if you wish.
2) Add icing to biscuits to join together

I made this one after the sponge, and it was MUCH easier to make. It is more of a fool proof recipe. I enjoyed that the ingredients were in grams, making it much easier to make sure I had the right amount of each ingredient. It was also lots of fun to have my children involved in icing the two sides of the biscuits together. Next time, I would make double the icing to give it the thick icing that I see on yo-yos when bought in the shops. These were such a hit in our house. They were all eaten within one day! I’ll definitely be making them again.
The process of starting this family recipe journal has been really lovely. I have been able to relive memories of the food I ate as a child, and I’m keeping all of these recipes so that I can in turn share them with my children when they are older. My children already love the sponge cake and the yo-yos biscuits, and I am so excited for them to be able to make these recipes when they are older.
I also know that as my children grow, they will love flipping through the recipe journal and finding the handwritten recipes that they make together. They can find their favourite meals there and favourite things to bake, and I know they will love choosing something to cook
I loved the process of collecting these recipes, I spoke to some of the people I am closest to in my family about their favourite recipes, about their experiences baking, and also for their special tips for success. It has been a lovely experience and I know I will continue adding to our family recipe journal.
If you love cooking or collecting special recipes, be sure to look at our recipe journals here, all designed in Australia and perfect for keeping all of your family’s favourite recipes.
I have been blogging for a few years now, but this is just my third post on the blog for this website. I’d love for you to follow along! Last week I wrote a blog about how to start a bullet journal which you can read her, or you can read my post where I give you 50 ideas on what to write in your journal. Next up, I’ll be writing about the wedding journal I’m about to gift to my newly engaged friend.
I’d love to have you follow along on Instagram or by putting your email address below.